SOCIAL MEDIA

On Sunday, September 18th I posted a FB Live video all about my plans for fall week with my Kindergarten student.  They were lovely plans, full of hope and high expectations.  However, things did not go that way due to this, that, and the other thing.  So I thought I'd pop-in and share what actually happened during our Fall Vocabulary Weeks (because we stretched it through 2 weeks)!


Monday 9/19 - Today went as planned.  I started by introducing the vocabulary words for the week.  My student already knew 2 of the 6 words (apple and pumpkin), which was good to build his confidence, and give him a point of reference.  We practiced saying the words with him repeating them after me three times.  
We then moved to the table to work on our listening activity.  I brought the pocket chart with words over to the table so that we could reference the words he didn't know like sweater and rakes.


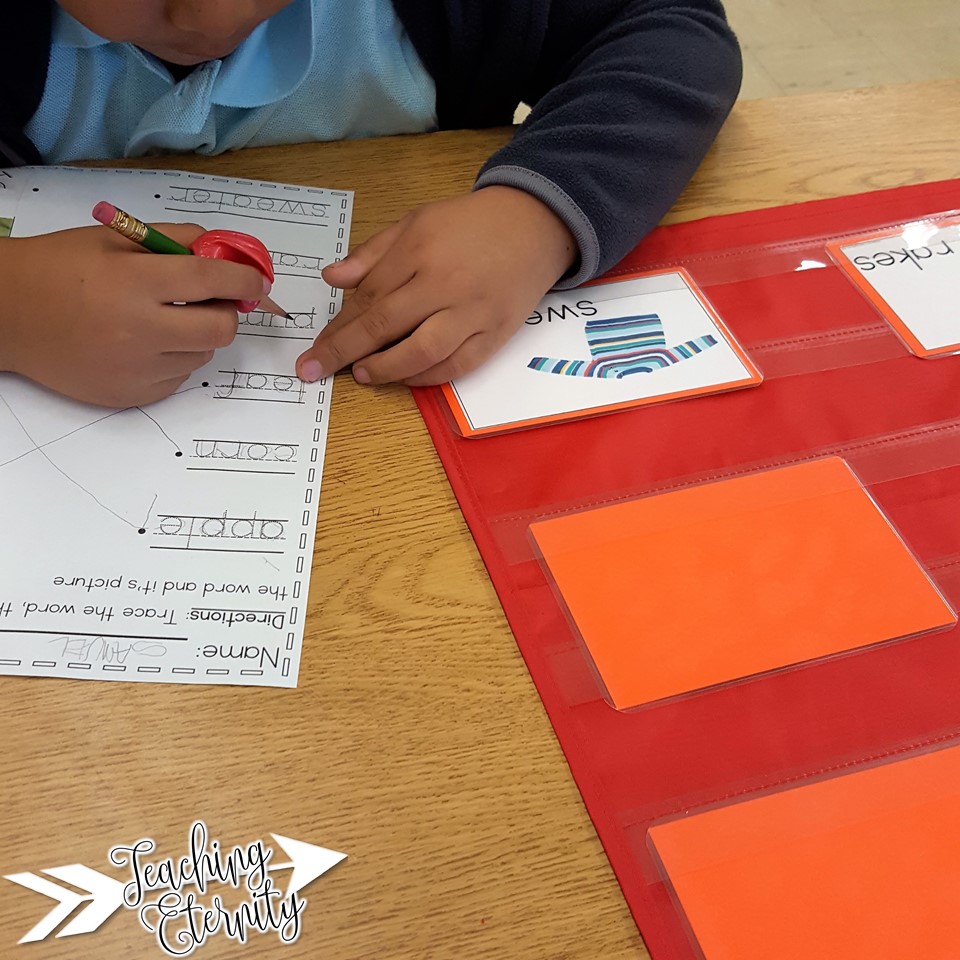
Tuesday 9/20 - Another day as planned.  We started by reviewing our words (3 times again) and then we moved to the table to trace and match our words.  At first this was more difficult for him than I anticipated, even with the pocket chart right there to reference.  About half-way through though he figured out the expectation and did very well.  

We then moved back to our mat to read the Apple Tree poem.  He thought this was a lot of fun.  Especially when we pretended to pick one of the apples and eat it!  We moved back to the table one more time and he was able to color in his own copy of the poem.  We discussed the colors of an apple tree.


Wednesday 9/21 - We started our time together just as any other day, by reviewing our words three times.  Today was the day he produced the third word independently (rakes).  We read our easy reader by him repeating me.  However he did practice pointing to each word.  Then we did a picture sort of 'Things you see in fall; Things you do not see in fall".  I wish I knew where this activity was from, but I do not.  I downloaded it (I think) from a blog post years ago, and I can not find it again.  


Thursday 9/22 - We started again by reviewing our words.  Then I read the book Fall Leaves Fall by Zoe Hall.  This was an interactive read-aloud, and we stopped to talk about the pictures and text frequently.  Then we went to the table and I introduced the writing task.  I showed him the pictures from the book again of all the things to do with fall leaves.  His favorite was to make a monster, and so he drew a leaf and made it a monster!  It was a super cute picture.  I wrote his sentence.  He started to trace it, but we ran out of time to finish.

Friday 9/23 - Our group was cancelled due to a scheduling conflict with school pictures and library time.

Monday 9/26 - Once again we reviewed the words.  I re-read Fall Leaves Fall and we traced and colored fall leaves using this freebie from KidSparkz.  He really enjoyed matching the leaves in his book to the shapes of the leaves in the read-aloud. He colored his pages to match the leaves in the book.  

Tuesday 9/27 - We reviewed the words to start our time and he was able to recognize apple, pumpkin, rakes and leaf independently.  I wanted to do some speaking practice so we sequenced the steps of making a jack-o-lantern.  I printed off the colored copy and student cut and glue page from this free pack by S is for Sarah.  We did the colored one together then talked through it.  I'd point to one of the pictures and he'd say what he saw, then I would turn that into a full sentence for him to repeat.  For example the 4th picture was drawing a face on the pumpkin.  My student said "face", I gave the sentence "Draw a face on the pumpkin" then he repeated it.  Then I gave him the student activity sheet and he cut out and glued the steps in order.  I explained that the first picture was of a pumpkin, and at the end it was a jack-o-lantern with a face.
  

Wednesday 9/28 - I was unable to be in school. :(

Thursday 9/29 - When we reviewed the words this day he knew all but sweater independently.  I decided to focus the day on apples and do some letter recognition practice, and sight word practice.  We re-read our apple poem.  Then I gave him this tree to color the apples either red, yellow, or green depending on the letter I'd put in them.  

Then we read the sight word sentence at the top, which featured the week's focus words.  Then I used the "I like..." flip book from Lavinia Pop's Fall Sight Word Fluency Flip Books.  He really liked this book.  

Friday 9/30 - The plan for today was to glue our fall words into his picture dictionary, however it hadn't come back from our printer yet.  So we reviewed our words and played memory.  We needed the pocket chart to make sure the words matched with the pictures.  I was really happy with his recall of what each picture was.  I didn't expect him to actually read the words independently at this point, but he learned the routine of the game and strategies to figure out the words by checking in the pocket chart.   I sent home the activity pages we'd finished along with some fall books from Reading A-Z today too!


So, all in all, things did not go completely as planned, but I think they went even better.  We did a lot of listening, speaking, reading and writing practice.  I was very happy with the progress my student made in recognizing and using the vocabulary.  The majority of our activities from the first week of our fall unit can be found in my Fall Vocabulary Unit in my TPT store.  We will spend the next few weeks focusing on school vocabulary: People, Places, Supplies and Things We Do at School.  


 photo Signature_zps73d808b4.png

Fall Vocabulary Unit: The Reality

Monday, October 3, 2016

This post was originally posted on the SeeMamaTeach collaborative blog.

Hello, It's Michelle from Teaching Eternity.  If you follow me on Instagram you know that despite the fact that school has started up I am still attempting #TotSchool activities with my son (henceforth known as Small Fry).

One day I had finished cutting out large bulletin board letters with my Cricut and was left with a bunch of scraps of neon card stock.  Rather than throw it away I decided I would make a #TotSchool activity out of it, and Small Fry and I would try making paper.  This blog post is not about how to make paper, although if you don't know how you'll learn.  Rather this is about the adventure of making paper with a Tot.


September 14, 2016:  I tried using my dinky at home paper shredder to shred this card stock, but I ended up breaking the shredder.   So I ripped it instead.  At first I put only a little bit of water in, but that wasn't much fun so I added more, enough to make the paper float.  I put the paper and water in one of our shoe box sized containers, put that container and Small Fry in the under the bed Fun Bin, and let him play around.  At first he enjoyed squishing the papers around but soon we discover that they stuck to his arms and legs. I'd stick one on, he'd giggle and pull it off and ask for more!


September 16, 2016:  After letting the paper set for 2 nights I threw it in the blender.  It didn't take long for it to turn into this mush!  Again I put the mush in a small bin inside the big bin, and Small Fry sat in the big bin.  This really helps to cut down on messes.  We used measuring spoons to scoop and dump the mush.  I thought about hiding some magnetic letters or plastic animals inside, but Small Fry didn't seem to keen on touching it.  I thought it felt really nifty - soft almost.


September 17, 2016: The next day we scooped all of that paper mush out onto a screen.  I got THIS ONE off of Amazon.  I didn't plan it this way, but it fit perfectly in the large Fun Bin.  It sat right on the ledge on the inside.  I do not have any great pictures of this one since I was busy making sure our mush made it onto the screen instead of the carpet!
After getting all of the mush onto the screen we had to press some of the water out.  I used paper towels for this.  This took quite a few rounds of pressing then wringing out the paper towels.  In the end there was a lot of water in the bin underneath.
I set the screen up on the kitchen counter (out of Small Fry's reach) to dry.  I propped it up on some little bowls to hopefully help it dry faster.


September 21, 2016:  Our paper was finally dry.  Truthfully it finished drying out on Monday, and I put it under some boxes to flatten it, then forgot where it was!  This was not the best paper.  It was more like really bumpy cardboard.  I think that was because I'd used card stock rather than regular paper.  It was also very fragile.  About 10 minutes after this picture one of the corners had been ripped off and there was a quarter sized hole in the middle.  (Small Fry loved holding it up to peek through!)

So, would I do it again?  The ripped paper and the mush part - yes.  The rest I may do again when he's older and can appreciate how cool it is to actually make paper and then use the paper he made.

For


Making Paper: A Tot School Adventure

Thursday, September 22, 2016

I'll be starting our Fall Unit in Kindergarten next week, so I took a moment to pull all of my fall books for our kindergarten book bin.  I was surprised at how few I had!  So I made a stop at the library on my way home and grabbed a few more.  I thought I'd share some of my favorites with you!


This book is fun to read-aloud! Since the words of the book follow the tune of the song I often find myself reading in a sing-song voice.  I like to stop every few pages and ask the kids "Why do you think she swallowed the ______?"  Or I'll ask "What do you think she could be making with the _____, ______, and _____?"  The kids think this Old Lady is hilarious.  When you're done you can do sequencing activities too.  

I picked this book up at the library, and it is adorable.  I'm not sure it would be the best as a read-aloud, but I definitely think it will be a favorite with the Kindergartners next week.  The pictures are combination of leaf rubbings and stampings, and construction paper illustrations.  I love that it shows different leaves from all different trees.  I plan to start collecting leaves as they fall in the coming weeks, and bring them in for the kids to try and figure out what leaves they have!

This book is great for a small-group, interactive read-aloud.  Almost every page has a question or activity for the class.  It talks about the many changes in fall, like the birds flying away and the sun setting earlier.  It talks about fall weather; getting cooler, rainy and windy.  It also talks about the things we do in fall, like harvest crops and go back to school.  In the back there are activity suggestions too! 

This was another library pick-up, and I've already ordered it, and many of the other Mouse books, from Amazon!  This would be another great read-aloud book.  The language in this book is simple, yet very rich.  The sentence structure is repetitive to appeal to a young reader, but it includes vocabulary for describing the leaves, and many different action words to describe what Mouse and Minka are doing outside on the cool fall day.  I think I may actually need to order a second set... one for home and one for school!

I love how this book starts with the end of summer, and ends with the start of winter.  It is like a little snapshot of the sequence of fall within a book.  The focus of this fall book is fall leaves, and all the things you can do with them.  The kids catch leaves in a net, jump on leaves, compare leaf sizes and shapes, rake leaves etc.  They also make a picture with the leaves and collect and label leaves.  My Fall Vocabulary Unit has two writing prompts that correspond to this book.

Looking for more fun fall books?  Check out these sites:


Do yo have any suggestions?  What other fall books should I be adding to my collection?


 photo Signature_zps73d808b4.png

Favorite Fall Books

Saturday, September 17, 2016

Today's post is going to be short and sweet!  It will also be picture heavy.  However I wanted to take a quick second to show you how I store and organize our Tot School stuff.  My system may not work for everyone depending on how much space you have or don't have, but I hope you can at least get some ideas!


It was important for me to have our TotSchool supplies up where Small Fry couldn't reach them.  When we were just getting started the stuff was on the dining room table, but I knew that wouldn't work for long.  My dog's kennels are in the same room we use as a playroom, so my dad built this little 'tabletop' for them.  I bought the 3 drawer organizer from Target and moved everything in!  You can see that I still do have some dog supplies on the side there, but this is the perfect place to keep a lot of our Tot School stuff! (Note:  I was being cheap budget conscious and bought the target brand drawers.  If I had to do it over I'd pay the extra for the name brand (Sterilite) drawers.  These ones feel flimsy to me.)


In the bottom drawer I have all of Small Fry's craft supplies.  He has alphabet stamps, alphabet sponges, modeling clay, paint, chalk, crayons, markers, colored pencils, and more.  I put this drawer on the bottom, since it it the heaviest!


Next up (literally) we have the materials for Small Fry's Sensory bins.  I store the rice, beans, cloud dough and pom-poms in Ziploc baggies.  I also have the shaving foam and hair gel in here, as well as the cups we use for scoops.


Everyone's got a Junk Drawer right?  This is some of the random TotSchool stuff.  I've got extra Ziploc bags, empty containers, duct tape, whiteboard supplies, and the foam alphabet stamps which Small Fry just likes to chew on, and they don't fit in the bottom craft supply drawer!

I keep our Dollar Store baking sheet and Tot School Tarp (AKA - shower curtain liner) on top of drawers.  Technically they would fit in the drawers but I'd have to take everything out of the drawer to get to them on the bottom, so it just works better to have them on top!  I have our smaller fun bins up here too.  That weird looking thing - we use it for fine motor practice by putting beads on the sticks - that doesn't fit in a drawer!


I put our Fun Bin behind the drawers.  There is nothing inside of it, so I don't have to take anything out to use it.  Honestly it's only here maybe 4 days out of 7.  It is usually either in use, drying after whatever activity we did the day before, or on the floor with whatever activity we did yesterday!

So that's my TotSchool Storage and Organization!  I hope some of my system either works for you, or helps you to figure out what would work for you!


 photo Signature_zps73d808b4.png

My TotSchool Summer - Organization and Storage

Friday, September 9, 2016

One of the biggest questions I get asked when I started posting my son's #TotSchool activities on Instagram was "Where do you come up with this stuff?!" ... Followed directly by "Where do you find the time?!"  So I thought I'd address those two questions!


As you can probably guess Pinterest is a big source of Tot School ideas.... but most of my ideas come from Instagram!  

Before I start with those I'd like to give a quick shout-out to my friend Heidi from Mac-N-Taters though.  She got me interested in doing Tot School with my son and has many, many amazing ideas!  She is my Tot School idol! 


When I go to Pinterest for Tot School ideas I usually just type "tot school".  If I'm looking for a specific topic I'll add that at the end.  Recently I've been searching "Tot School Fall".  I may also add in my son's age so I don't get a lot of activities either too old or too young for him.  However every once in a while I come across a pinner I decide I want to follow! (pictures linked)

 I love how these boards are organized.  My favorite is the sensory board since my son loves all of our sensory activities the most.  She also has lots of boards for different holidays!

I love this account because she has Tot School ideas arranged by age groups further down on her page!  This was a great way for me to get ideas specific to my son's age group.  She also has Kindergarten and Primary pins that I like as a teacher.

I love all of the Montessori ideas from this pinner.  She has Montessori boards for EVERYTHING!

If you'd like, you can follow my own Tot School board HERE!


Most of my ideas I get from various accounts on Instagram. (Pictures Linked)

Instagram user (@sensorybabyj is a great account for me because this little guy is just 2 months younger than my son.  That means the activities posted on this account are going to be appropriate for my little guy! This account also has a lot of Montessori type activities which I am loving these days.

@playideas is primarily a reposting account, meaning they repost ideas from other accounts.  This is how I have found many of the Tot School inspiration accounts that I follow.

My favorite IG account though is @busytoddler.  I have used so many of these ideas.  In fact, the first week or so of Tot School featured ideas I'd gotten from this account exclusively.  She has two kids, a son who's a good bit older than my guy and a daughter who's a little bit younger.  So scrolling through I can usually find something to occupy our time!

I post my son's Tot School activities on my Instagram account HERE!


To quickly address the question of "How do you find the time for it?!"  ... I don't have some ground-breaking answer.  My biggest tip is to find an idea that requires things you already have on hand, then assemble the activity together.  Small fry loved helping me dump the flour and salt together for our salt dough.  When I shredded paper to use in a bin he liked the shredder best. He gets so excited when I start filling bins with water.  Another tip is to save your sensory bin materials and Tot School stuff all in one place, and don't be afraid to repeat.  We've used the pom-poms, beans and rice multiple times this summer!

Want to read about our top 3 activities from this past summer.  Check out my last post here:


And be on the lookout for a post about how I store and organize my Tot School materials!

 photo Signature_zps73d808b4.png

My #TotSchool Summer - Activity Inspiration

Monday, September 5, 2016

Instagram